
[ad_1]
The Star Wars galaxy is filled with secrets and techniques, and the Jedha Sanctuary Temple in Jedi: Survivor isn’t any exception with its many hidden collectible places. There are Jedha Scrolls, Databank Entries, a Pressure Level dispersed across the location, so we’ve put collectively a map for this information together with a walkthrough so you’ll be able to obtain 100% completion within the zone.
All Sanctuary temple collectible places in Jedi: Survivor
The totally different collectibles at Sanctuary Temple are pretty unfold out, however there are usually not too many hidden away. You possibly can acquire all of those in about 5 to 10 minutes. The one means you want is Merrin’s Attraction for passing by means of the ray shields.
One of the best place to begin is on the temple entrance. Simply comply with the linear route by means of the extent to gather every thing. Remember that our walkthrough merely particulars every collectible location by class.
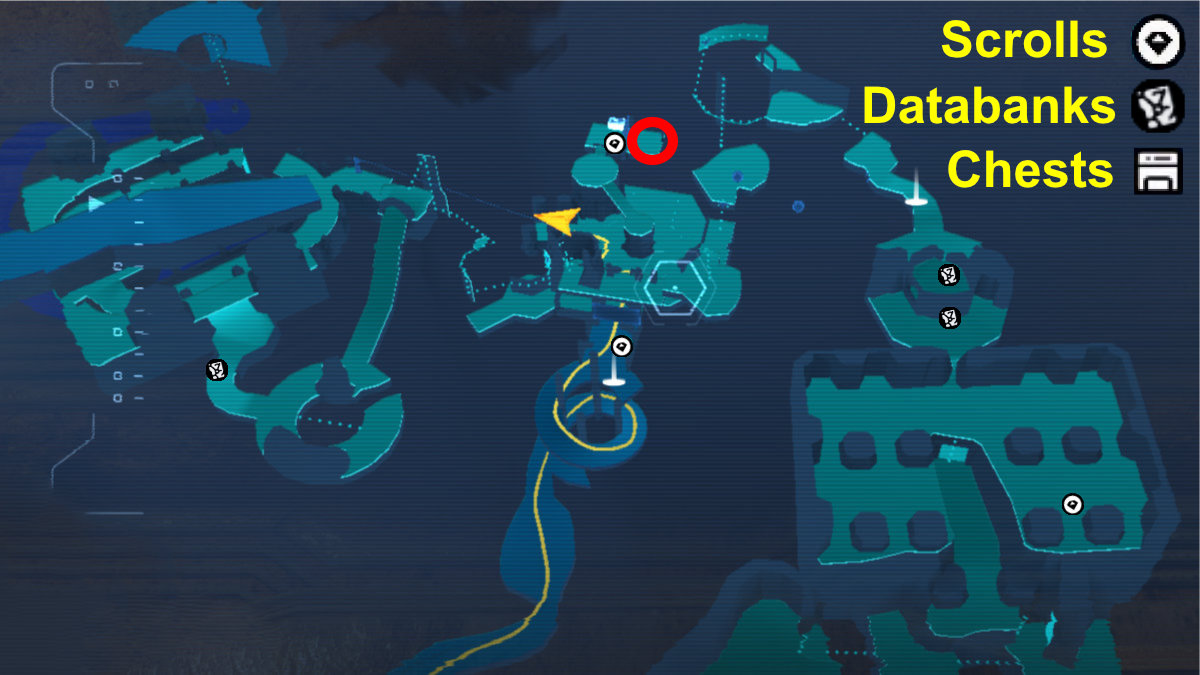
All Jedha Scrolls
The primary Jedha Scroll is outdoors the temple on the touchdown with the stone columns. Searching in direction of the valley, you’ll discover the Scroll on the bottom at left finish between the outer columns.
Navigate to the primary giant chamber throughout the temple for the second and third Jedha Scrolls. That is the chamber with the a number of giant hanging braziers and pit with the round platform within the center. There are inexperienced ray shields on the left-hand facet whenever you enter. Use sprint to warp by means of the ray protect and strategy the Meditation Level. There’s a Jedha Scroll laying on the bottom close to the wall simply earlier than the Meditation Level.
Return again to the big chamber and instantly take a left right into a small alcove. The wall is climbable and also you’ll use that to achieve top and attain the central touchdown and interlinking bridge. There’s a door throughout the bridge which opens to a facet room with the third Jedha Scroll. You’ll additionally discover a Pressure Level behind a ray protect in that room.

Picture by PC Invasion
All Databank Entries
Two of the Databank Entries are close to the doorway to the Sanctuary Temple. The primary is at an inscription on the middle pillar within the round discussion board when you squeeze by means of the collapsed entrance to Sanctuary Temple. The subsequent is within the room inside the middle pillar at some previous pottery.
The final Databank Entry is straightforward to seek out if you happen to comply with the pure stage development in direction of the central chamber the place the Imperial Excavator seems in the principle story. You have to undergo the platforming part within the backrooms, then leap from wall to wall and climb right into a passage. Run down the passage, leap throughout a niche and comply with that hallway. The Databank Entry pertains to some wall inscriptions in that final hallway that opens to the principle chamber. If you have already got the shortcut, simply zipline throughout the chasm and take a left and climb as much as the hallway containing the Databank Entry.
Don’t neglect the Pressure Level behind the ray protect within the facet room with the third Jedha Scroll and the workbench.
That’s the entire Sanctuary Temple Collectible Areas in Jedi: Survivor. We even have some guides overlaying all Priorite Shard places at Rambler’s Attain Outpost on Koboh and one other overlaying all collectible places on the Loading Gantry Lucrehulk on Koboh. Bounty looking is one other distinguished facet quest in Jedi: Survivor, and we’ve lined all 18 Bounty Puck places, too.
[ad_2]
Source link

